Wind direction calibration for your Weather Station: Vantage Connect or Enviromonitor

Wind direction calibration for your Weather Station: Vantage Connect or Enviromonitor

Overview:

A Davis weather station's anemometer should be oriented northward. A correction can be made inside WeatherLink.com if this isn't done or isn't feasible. The steps to accomplish this are outlined below.

Instructions for using EnviroMonitor

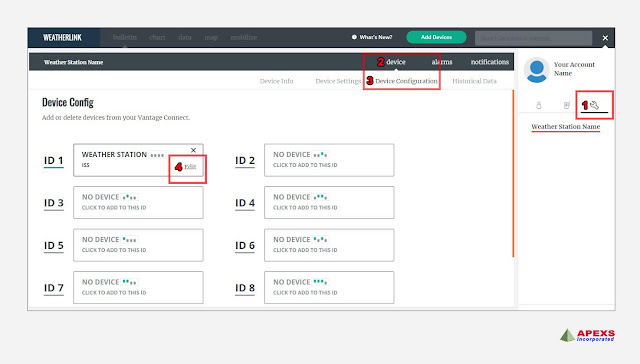
  • Go to WeatherLink.com and find the weather station that needs to be fixed.
  • Next, select Device->Device Configuration from the "wrench" symbol.
  • Then, next to the highlighted ID #, click "edit."
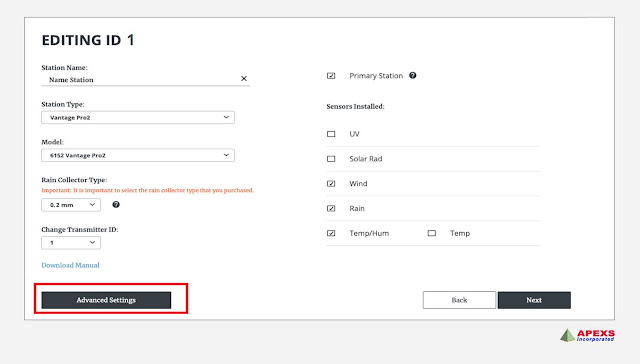
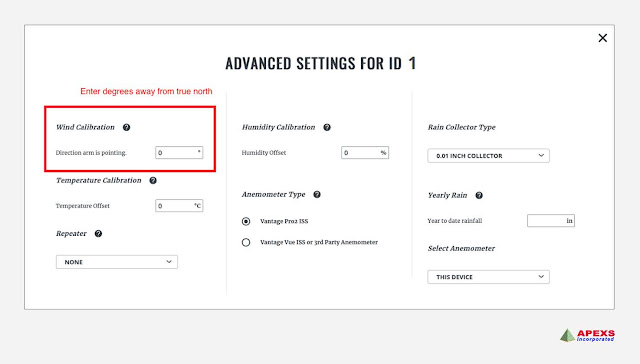
  • Select "advanced options" on the following screen. (For further information, check below image)
  • Finally, in degrees, input the angle between the install direction and true North, then click exit.
Weatherlink: Wind direction calibration for your Weather Station

Weatherlink Config: Wind direction calibration for your Weather Station

APEXS: Weatherlink Config Advance: Wind direction calibration for your Weather Station

APEXS: weatherlink advance config wind: Wind direction calibration for your Weather Station


Vantage Connect Instructions

  • Log in to WeatherLink.com and choose the weather station that need correction.
  • Then go to Device->Device Settings by clicking the "wrench" symbol.
  • Finally, in degrees, input the difference between the install direction and actual North, then save and exit.
APEXS: Vantage Connect device setting, Wind direction calibration for your Weather Station


Please contact us with any further questions.

support@davisweatherstation.com


Wind calibration on your Vantage Connect Weather Station

Wind calibration on your Vantage Connect Weather Station

Overview:

The anemometer at a Davis weather station should face north. If this isn't done or isn't possible, a correction can be made through WeatherLink.com. The procedures for doing so are explained below.

Vantage Connect used instructions:

  • Log in to WeatherLink.com and choose the weather station that need adjustment.
  • Then, by clicking the "wrench" icon, navigate to Device => Device Settings.
  • Finally, enter the difference in degrees between the install direction and true North, save, and exit.
 
Weatherlink device settings: Wind calibration on your Vantage Connect Weather Station


Wind calibration on your EnviroMonitor Weather Station

Wind calibration on your EnviroMonitor Weather Station

Overview:

The anemometer at a Davis weather station should face north. If this isn't done or isn't possible, a correction can be made through WeatherLink.com. The procedures for doing so are explained below.

EnviroMonitor use instructions:

  • Go to WeatherLink.com and select the weather station that needs to be fixed.
  • Then, from the "wrench" icon, select Device => Device Configuration.
  • Then click "edit" next to the highlighted ID #.
  • On the next page, select "advanced settings." (See the picture below for more details.)
  • Finally, enter the angle between the install direction and true North in degrees before clicking exit. 
EnviroMonitor Weatherlink Device Config: Wind calibration on your EnviroMonitor Weather Station
EnviroMonitor Weatherlink Advance Settings: Wind calibration on your EnviroMonitor Weather Station
EnviroMonitor Weatherlink Advance Settings for wind: Wind calibration on your EnviroMonitor Weather Station


Please contact us with any further questions.


Maintaining the Integrated Sensor Suite (ISS) in Vantage Pro2 weather station

Maintaining the Integrated Sensor Suite (ISS) in Vantage Pro2 weather station

Maintaining the Integrated Sensor Suite (ISS) will assure that your weather instruments will continue to perform at their highest accuracy.


These are some issues you may encountered if not maintaining the Integrated Sensor Suite (ISS).

  • Console shows the message: “LOW TX BATTERY” (wireless stations only).

The common solutions you may perform into anemometer wind vane is to:

  • Replace the 3-volt lithium battery inside the transmitter shelter


A little note, because note saves you from despair. :-)

  • The message “LOW CONSOLE BATTERIES” indicates that the C-cell batteries in the console need to be replaced
 
If you forgot what ISS is, please see below image/picture. This is a list of weather station showing the ISS or the Integrated Sensor Suite.
 
 
Vantage Pro2 : Maintaining the Integrated Sensor Suite (ISS) in Vantage Pro2 weather station

Vantage Vue ISS: Maintaining the Integrated Sensor Suite (ISS) in Vantage Pro2 weather station


What if you have encountered the problem in ISS solar panel?


These are the common issues you may encountered in ISS solar panel:

  • Solar panels look hazy.
 
 
In order to fix that problem, use these following solution.

  • Sunlight can make the solar panels look hazy or cloudy. 
  • However, this haziness will not affect performance and needs no maintenance. 
  • You should just keep the solar panels clear of snow, dust or debris for best charging.


Vantage Pro2 Plus: Maintaining the Integrated Sensor Suite (ISS) in Vantage Pro2 weather station 


Maintaining the Radiation Shield in your Vantage Pro2 weather station

Maintaining the Radiation Shield in your Vantage Pro2 weather station

Maintaining the Radiation Shield will assure that your weather instruments will continue to perform at their highest accuracy.

These is are the issues you may encountered if you forget to conduct a regular maintenance in your Radiation Shield Vantage Pro2 weather station.

  • Excessive dirt and build-up on the plating can hamper air flow.


The common solutions you may used in maintaining the Radiation Shield in your Vantage Pro2 weather station is to do the following.

  • Wipe the outer edge of each ring with a damp cloth.

Repair: Maintaining the Radiation Shield in your Vantage Pro2 weather station

Another problem you may encountered is:

  • Debris or insect nests inside the radiation shield.


In order to fix that problem, you can perform these following solution.
  • Check the radiation shield at least once a year for debris or insect nests and clean when necessary. 
  • You should disassemble and thoroughly clean your radiation shield at least once a year.
  • See your ISS User Manual for detailed instructions.

A little Note.

If you have a 24-Hour Fan-Aspirated Radiation Shield, it is a good idea to replace the NiCad C-cell batteries when you clean the shield.


Maintaining the Outside Temperature Humidity Sensor in Vantage Pro2 weather station

Maintaining the Outside Temperature Humidity Sensor in Vantage Pro2 weather station

Maintaining the Outside Temperature Humidity Sensor in Vantage Pro2 weather station will assure that your weather instruments will continue to perform at their highest accuracy. 

These are some issues that you may encountered if your not maintaining the Outside Temperature Humidity Sensor in Vantage Pro2 weather station. 
  • Dust build-up can interfere with air flow over the sensor.

The common solutions you may used in maintaining the anemometer wind vane is the following. 
  • When you remove the plate in the radiation shield on which the the temp-hum board is installed, you will see a small, white, vented cover lined with gold-colored mesh. 
  • Using a clean, dry toothbrush, gently remove any dust from the cover. 
  • You can remove the cover from the board and take out the mesh to do a more thorough cleaning if necessary
Repair: Maintaining the Outside Temperature Humidity Sensor in Vantage Pro2 weather station


Maintaining the Anemometer Wind Cups in Vantage Pro2 weather station

Maintaining the Anemometer Wind Cups in Vantage Pro2 weather station

Maintaining the Anemometer Wind Cups in your weather station will assure you that your weather data will continue to perform at their highest accuracy.


These are some issues you may have encountered if no regular maintenance has been made into your anemometer wind cups.

  • Spiders and other insects can interfere with the rotation of the cups. 
  • Debris.

APEXS: Maintaining the Anemometer Wind Cups in Vantage Pro2 weather station


The common solutions you may used in maintaining your anemometer wind cups is to do the following:

  • If wind speed seems low, use an Allen wrench to loosen the setscrew on the side of the wind cups. 
  • Remove the wind cups, and clean the exposed portion of the shaft with a damp cloth or cotton swab. 
  • Clean the wind cups with water and a mild liquid detergent. Rinse thoroughly before replacing.
  • After replacing the wind cups and tightening the setscrew, check to make sure that the wind cups spin freely. 
  • If they do not, the bearings may be worn and need factory repair.

Caution, take an extra precaution when doing the maintenance.

  • Do not use or add grease, oil, or a spray lubricant of any kind in your anemometer.


Maintaining the Anemometer Wind Vane in VP2

Maintaining the Anemometer Wind Vane in VP2

Maintaining the Anemometer Wind Vane will assure you that your weather instruments will continue to perform at their highest accuracy.


These are some issues you may have encountered if no regular maintenance of anemometer wind vane:

  • Anemometer arm may have rotated out of proper orientation.
  • Debris.
APEXS: Maintaining the Anemometer Wind Vane in VP2


The common solutions you may used in maintaining the anemometer wind vane is to do the following:

  • Check the orientation of the anemometer annually. 
  • The console is factory-calibrated to report accurate wind direction when the anemometer arm is pointed due north.
  • See your User Manual for details on how to calibrate your console’s wind direction if the arm cannot be mounted pointing north.

Award winning and recognized