Wind direction calibration for your Weather Station: Vantage Connect or Enviromonitor

Wind direction calibration for your Weather Station: Vantage Connect or Enviromonitor

Overview:

A Davis weather station's anemometer should be oriented northward. A correction can be made inside WeatherLink.com if this isn't done or isn't feasible. The steps to accomplish this are outlined below.

Instructions for using EnviroMonitor

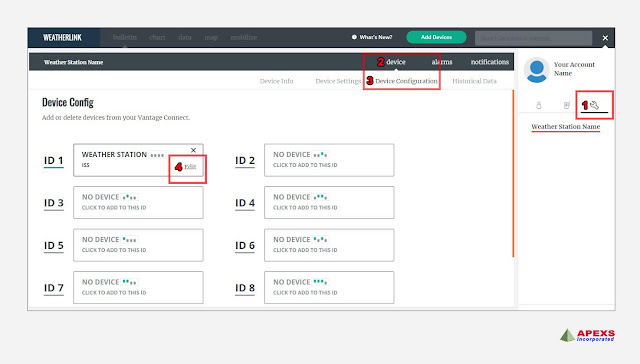
  • Go to WeatherLink.com and find the weather station that needs to be fixed.
  • Next, select Device->Device Configuration from the "wrench" symbol.
  • Then, next to the highlighted ID #, click "edit."
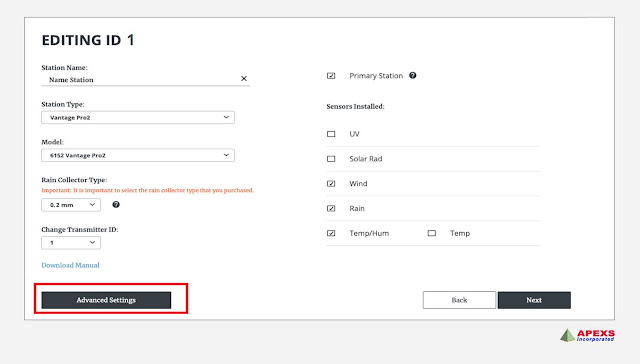
  • Select "advanced options" on the following screen. (For further information, check below image)
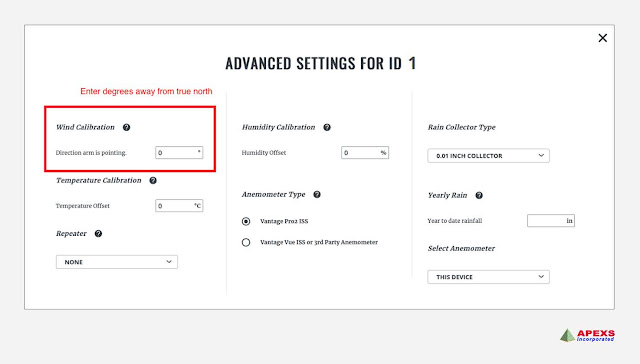
  • Finally, in degrees, input the angle between the install direction and true North, then click exit.
Weatherlink: Wind direction calibration for your Weather Station

Weatherlink Config: Wind direction calibration for your Weather Station

APEXS: Weatherlink Config Advance: Wind direction calibration for your Weather Station

APEXS: weatherlink advance config wind: Wind direction calibration for your Weather Station


Vantage Connect Instructions

  • Log in to WeatherLink.com and choose the weather station that need correction.
  • Then go to Device->Device Settings by clicking the "wrench" symbol.
  • Finally, in degrees, input the difference between the install direction and actual North, then save and exit.
APEXS: Vantage Connect device setting, Wind direction calibration for your Weather Station


Please contact us with any further questions.

support@davisweatherstation.com


Wind calibration on your Vantage Connect Weather Station

Wind calibration on your Vantage Connect Weather Station

Overview:

The anemometer at a Davis weather station should face north. If this isn't done or isn't possible, a correction can be made through WeatherLink.com. The procedures for doing so are explained below.

Vantage Connect used instructions:

  • Log in to WeatherLink.com and choose the weather station that need adjustment.
  • Then, by clicking the "wrench" icon, navigate to Device => Device Settings.
  • Finally, enter the difference in degrees between the install direction and true North, save, and exit.
 
Weatherlink device settings: Wind calibration on your Vantage Connect Weather Station


Wind calibration on your EnviroMonitor Weather Station

Wind calibration on your EnviroMonitor Weather Station

Overview:

The anemometer at a Davis weather station should face north. If this isn't done or isn't possible, a correction can be made through WeatherLink.com. The procedures for doing so are explained below.

EnviroMonitor use instructions:

  • Go to WeatherLink.com and select the weather station that needs to be fixed.
  • Then, from the "wrench" icon, select Device => Device Configuration.
  • Then click "edit" next to the highlighted ID #.
  • On the next page, select "advanced settings." (See the picture below for more details.)
  • Finally, enter the angle between the install direction and true North in degrees before clicking exit. 
EnviroMonitor Weatherlink Device Config: Wind calibration on your EnviroMonitor Weather Station
EnviroMonitor Weatherlink Advance Settings: Wind calibration on your EnviroMonitor Weather Station
EnviroMonitor Weatherlink Advance Settings for wind: Wind calibration on your EnviroMonitor Weather Station


Please contact us with any further questions.


Maintaining the Integrated Sensor Suite (ISS) in Vantage Pro2 weather station

Maintaining the Integrated Sensor Suite (ISS) in Vantage Pro2 weather station

Maintaining the Integrated Sensor Suite (ISS) will assure that your weather instruments will continue to perform at their highest accuracy.


These are some issues you may encountered if not maintaining the Integrated Sensor Suite (ISS).

  • Console shows the message: “LOW TX BATTERY” (wireless stations only).

The common solutions you may perform into anemometer wind vane is to:

  • Replace the 3-volt lithium battery inside the transmitter shelter


A little note, because note saves you from despair. :-)

  • The message “LOW CONSOLE BATTERIES” indicates that the C-cell batteries in the console need to be replaced
 
If you forgot what ISS is, please see below image/picture. This is a list of weather station showing the ISS or the Integrated Sensor Suite.
 
 
Vantage Pro2 : Maintaining the Integrated Sensor Suite (ISS) in Vantage Pro2 weather station

Vantage Vue ISS: Maintaining the Integrated Sensor Suite (ISS) in Vantage Pro2 weather station


What if you have encountered the problem in ISS solar panel?


These are the common issues you may encountered in ISS solar panel:

  • Solar panels look hazy.
 
 
In order to fix that problem, use these following solution.

  • Sunlight can make the solar panels look hazy or cloudy. 
  • However, this haziness will not affect performance and needs no maintenance. 
  • You should just keep the solar panels clear of snow, dust or debris for best charging.


Vantage Pro2 Plus: Maintaining the Integrated Sensor Suite (ISS) in Vantage Pro2 weather station 


Maintaining the Radiation Shield in your Vantage Pro2 weather station

Maintaining the Radiation Shield in your Vantage Pro2 weather station

Maintaining the Radiation Shield will assure that your weather instruments will continue to perform at their highest accuracy.

These is are the issues you may encountered if you forget to conduct a regular maintenance in your Radiation Shield Vantage Pro2 weather station.

  • Excessive dirt and build-up on the plating can hamper air flow.


The common solutions you may used in maintaining the Radiation Shield in your Vantage Pro2 weather station is to do the following.

  • Wipe the outer edge of each ring with a damp cloth.

Repair: Maintaining the Radiation Shield in your Vantage Pro2 weather station

Another problem you may encountered is:

  • Debris or insect nests inside the radiation shield.


In order to fix that problem, you can perform these following solution.
  • Check the radiation shield at least once a year for debris or insect nests and clean when necessary. 
  • You should disassemble and thoroughly clean your radiation shield at least once a year.
  • See your ISS User Manual for detailed instructions.

A little Note.

If you have a 24-Hour Fan-Aspirated Radiation Shield, it is a good idea to replace the NiCad C-cell batteries when you clean the shield.


Maintaining the Outside Temperature Humidity Sensor in Vantage Pro2 weather station

Maintaining the Outside Temperature Humidity Sensor in Vantage Pro2 weather station

Maintaining the Outside Temperature Humidity Sensor in Vantage Pro2 weather station will assure that your weather instruments will continue to perform at their highest accuracy. 

These are some issues that you may encountered if your not maintaining the Outside Temperature Humidity Sensor in Vantage Pro2 weather station. 
  • Dust build-up can interfere with air flow over the sensor.

The common solutions you may used in maintaining the anemometer wind vane is the following. 
  • When you remove the plate in the radiation shield on which the the temp-hum board is installed, you will see a small, white, vented cover lined with gold-colored mesh. 
  • Using a clean, dry toothbrush, gently remove any dust from the cover. 
  • You can remove the cover from the board and take out the mesh to do a more thorough cleaning if necessary
Repair: Maintaining the Outside Temperature Humidity Sensor in Vantage Pro2 weather station


Maintaining the Anemometer Wind Cups in Vantage Pro2 weather station

Maintaining the Anemometer Wind Cups in Vantage Pro2 weather station

Maintaining the Anemometer Wind Cups in your weather station will assure you that your weather data will continue to perform at their highest accuracy.


These are some issues you may have encountered if no regular maintenance has been made into your anemometer wind cups.

  • Spiders and other insects can interfere with the rotation of the cups. 
  • Debris.

APEXS: Maintaining the Anemometer Wind Cups in Vantage Pro2 weather station


The common solutions you may used in maintaining your anemometer wind cups is to do the following:

  • If wind speed seems low, use an Allen wrench to loosen the setscrew on the side of the wind cups. 
  • Remove the wind cups, and clean the exposed portion of the shaft with a damp cloth or cotton swab. 
  • Clean the wind cups with water and a mild liquid detergent. Rinse thoroughly before replacing.
  • After replacing the wind cups and tightening the setscrew, check to make sure that the wind cups spin freely. 
  • If they do not, the bearings may be worn and need factory repair.

Caution, take an extra precaution when doing the maintenance.

  • Do not use or add grease, oil, or a spray lubricant of any kind in your anemometer.


Maintaining the Anemometer Wind Vane in VP2

Maintaining the Anemometer Wind Vane in VP2

Maintaining the Anemometer Wind Vane will assure you that your weather instruments will continue to perform at their highest accuracy.


These are some issues you may have encountered if no regular maintenance of anemometer wind vane:

  • Anemometer arm may have rotated out of proper orientation.
  • Debris.
APEXS: Maintaining the Anemometer Wind Vane in VP2


The common solutions you may used in maintaining the anemometer wind vane is to do the following:

  • Check the orientation of the anemometer annually. 
  • The console is factory-calibrated to report accurate wind direction when the anemometer arm is pointed due north.
  • See your User Manual for details on how to calibrate your console’s wind direction if the arm cannot be mounted pointing north.

Video: Installation Guide of Davis Vantage Pro2 Plus

Video: Installation Guide of Davis Vantage Pro2 Plus

APEXS: Installation Guide of Davis Vantage Pro2 Plus


Part 1 : Straight From The Box

The following video is a Straight From The Box of Davis Vantage Pro2 Plus.

Davis Vantage Pro2 Plus Weather Station Installation - Part 1: Straight From The Box

This is a first video in a three-part series covering the installation/replacement of 11 years old Vantage Pro2 weather station. In this first part, we look at the contents of a newly purchased Davis Vantage Pro2 Plus Weather Station.

Posted by Davis Vantage Pro2 PH on Tuesday, August 10, 2021
Help: Click on 720p for a video high quality resolution.
This is the first video in a three-part series covering the replacement of 11 years old Vantage Pro2 station. In this first part, we look at the contents of a newly purchased Davis Vantage Pro2 Plus Weather Station.


Part 2 : Mounting the Integrated Sensor Suite (ISS) and Anemometer

The following video is a Mounting the Integrated Sensor Suite (ISS) and Anemometer of Davis Vantage Pro2 Plus.
 
 
Davis Vantage Pro2 Plus Weather Station Installation - Part 2: Mounting the Integrated Sensor Suite (ISS) and Anemometer

This is the second video in our three-part series covering the replacement of our 11 years old Vantage Pro2 station. In this second part, we mount/install the Integrated Sensor Suite and a remote anemometer. The remote anemometer requires the use of a Davis Wireless Transmitter (6332). We will show you how to configure this unit as well.

Posted by Davis Vantage Pro2 PH on Tuesday, August 10, 2021
Help: Click on 720p for a video high quality resolution.
This is the second video in our three-part series covering the replacement of our 11 years old Vantage Pro2 station. In this second part, we mount/install the Integrated Sensor Suite and a remote anemometer. The remote anemometer requires the use of a Davis Wireless Transmitter (6332). We will show you how to configure this unit as well.


Part 3 : Configuring the Console and Installing WeatherLink

The following video is a Configuring the Console and Installing WeatherLink.
 
Davis Vantage Pro2 Plus Weather Station Installation - Part 3: Configuring the Console and Installing WeatherLink

This is the third video in our three-part series covering the replacement of our 11 years old Vantage Pro2 station. In this final installment we will begin configuring the Vantage Pro2 Weather Station Console (6312). This console is used on both the Pro2 and Pro2 Plus models. We also cover the installation and configuration of WeatherLink for the local storage of your observational data. We finish the video with a look into wx2sql, the program that I use to store my weather observations in a MYSQL database.

Posted by Davis Vantage Pro2 PH on Tuesday, August 10, 2021
Help: Click on 720p for a video high quality resolution.
This is the third video in our three-part series covering the replacement of our 11 years old Vantage Pro2 station. In this final installment we will begin configuring the Vantage Pro2 Weather Station Console (6312). This console is used on both the Pro2 and Pro2 Plus models. We also cover the installation and configuration of WeatherLink for the local storage of your observational data. We finish the video with a look into wx2sql, the program that I use to store my weather observations in a MYSQL database.

On WeatherLink.com, you can graph weather data.

Charting weather data on WeatherLink.com is demonstrated in this video.


Please contact us with any further questions.

contact@apexsinc.com 

How automated weather station works

How does an automated weather station function?

Let us first define what a weather station is before diving into how an automated weather station operates.

What is the purpose of a weather station?

A weather station is a device that uses a variety of sensors to collect data about the weather and surroundings. That's all there is to it, a simple explanation. 

Weather centers, personal weather stations, professional weather stations, home weather stations, weather forecasters, and forecasters are various terms used to describe automated weather stations.

Weather station data, such as temperature highs and lows, cloud cover, and precipitation probability, may be used to assess present weather conditions and anticipate future weather forecasts.

Meteorologists, weather lovers, gardeners, farmers, outdoor enthusiasts, students, pilots — everyone who likes weather data or depends on the weather to make choices – use automated weather stations.

The weather Guys explain why weather stations are different from internet weather websites and phone weather applications in this video.

A variety of sensors are used in an automated weather station.

A list of measuring instruments that come with a home weather station is as follows:

Thermometer  –  A thermometer is a device that measures the temperature. Weather stations measure both interior and outdoor temperatures, record highs and lows, display trend arrows to indicate rising or dropping temperatures, and even forecast short-term future temperature ranges.

Hygrometer –  A hygrometer is a device that monitors relative humidity levels. The quantity or percentage of water vapor (water in gas form) in the air is known as relative humidity. Environmental variables and computations such as precipitation, fog, dew point, and heat index are influenced by humidity. Furthermore, keeping correct humidity levels in your house has consequences for both your health and your home.

Barometer –  A barometer is a device that monitors the pressure in the atmosphere. Based on the variations in atmospheric pressure that a barometer measures, it can assist anticipate impending weather. A barometric pressure history chart or a pressure trend arrow are available on certain weather stations, allowing you to readily follow changes such as a pressure decline.

Anemometer –  An anemometer is a device that measures the speed at which the wind blows. A weather station can display wind speed in miles per hour, kilometers per hour, or knots, as well as record current, peak, and average wind speeds.

Wind Vane – A wind vane, also known as a weather vane, is a device that determines the direction of the wind. A 16-point wind rise is used by weather stations to represent this information.

Rain Gauge – A rain gauge is a device that monitors the amount of rain or liquid precipitation that falls on the ground. Rainfall warnings are available on certain weather stations, letting you know when a rain storm has started or if flooding is a possibility.


Please contact us with any further questions.

contact@davisweatherstation.com

Vantage Connect should allow users to choose which SIM card they want to use

By default, Vantage Connect uses a Globe Telecom SIM card. However, because it is the only GPRS signal accessible in the region, some of our weather station clients prefer to utilize Simcard from Smart Communication.

Raised Question:

Is it possible for Vantage Connect to allow users to choose which SIM card they want to use? I understand that Smart Communication will have a higher monthly price, which is fine as long as the client has a choice.

Davis Feedback:

Our 6620G Vantage Connect has a SIM that will roam on Smart Communications. You will need to use the region subscription, 6632C, 6634C or 6636C.

So you would buy

  • 6620G - Vantage Connect

and

  • 6632C or 6634C or 6636C
The 6620G will also work on Globe.  If you find that the 6620G is not working let me know and I can see if it’s trying Globe erroneously….and work with the SIM partner to change the priority.

Please contact us with any further questions.

How to Maintain Davis Vantage Pro2 Equipment

This maintenance video demonstrates what has to be done and how to do it to keep your weather station in good condition.


How to keep your Vantage Pro2 in great condition by cleaning it?


You'll need a soft cloth, a Philips screwdriver, an Allen wrench, a soft-bristled brush, and a soft-bristled brush. Mild soap and water are optional.

Cleaning your Vantage Pro2 consists of the following steps:
  1. Clean the UV sensor with a clean cloth and denatured alcohol if required. Do not put your hands on the diffuser.
  2. Using a moistened soft cloth, clean the solar radiation sensor. Do not put your hands on the diffuser.
  3. Clean out the dirt in the cone by removing the debris screen. Clean your rain collector a few times a year for the best results.
  4. To avoid adding erroneous data while touching the sensors, we recommend opening the transmitter shelter (the white box with the solar panel on the front) and disconnecting the sensors from the interface before proceeding.
  5. The rain cone should be removed from the sensor suite.
  6. Clean the tipping buckets with a wet towel. Use mild soap and water when required. Rinse well. Clean the rain collection drains as well.
  7. Remove the three screws from the radiation shielding with a Philips screwdriver. To keep the shields from falling apart, place your hands under them while you remove the last screw.
  8. Set aside everything except the top plate, which contains the sensor, until you're ready to reassemble it.
  9. Clean the mesh with a soft-bristled brush. If there is a lot of debris, remove the basket and wipe the mesh with mild soap and water. Before returning it to the sensor, give it a thorough rinse.
  10. With an Allen wrench, remove the wind cups. Wipe the shaft with a moist towel. Clean the wind vane and cups with mild soap and water. After a thorough rinse, reattach the cups.
Please contact us with any further questions.


WeatherLink Irrigation Add

Irrigation Addition in WeatherLink

This Data Logger is designed for use with most common irrigation systems, including those provided by Rain Bird, Rain Master, and Toro. 


File Name: 07395-216_Adendm_06560.pdf

Released: March 05, 2007

View or Download the PDF file


Please contact us with any further questions.

contact@davisweatherstation.com

WeatherLink Toolbox (7802)

This brief overview is intended to assist you in getting started as quickly as possible. After you've installed the program, follow the directions in the online help file or the manual to configure the Toolbox.


Version: A

File Name: wl_toolbox.pdf

Released: June 23, 1999

View or Download PDF file:

https://apexvalue.com/~/u/2018/04/wl_toolbox.pdf


Please contact us with any further questions.

contact@davisweatherstation.com

How can I get access to my data if I'm on site but don't have access to a computer with Internet access?

If you need to view your weather data quickly in a remote location but don't have access to a PC with an internet connection, you may connect a laptop (or PC) directly to the Vantage Connect and use the provided WeatherLink software to download all of the archive records stored in its memory. 

An interface cable is required. To order a Connect interface cable, please contact us.


What is the best way to transfer my WeatherLink data from one computer to another?

Use Windows Explorer to locate and look in the Weatherlink installation folder on your previous PC to transfer the weatherlink data. This WeatherLink folder is usually found in the program files directory (c:/Program Files) or at the root (c:). 

In WeatherLink, there will be a folder titled after the name you picked for your station (e.g. C:weatherlinkbrettsWX). Copy this complete folder, which is titled after your station, to your new PC's Weatherlink folder. The data should be available when you open that station on the new PC.

Alternatively, you may just transfer the data files yourself. After using WeatherLink to create a new station on the new PC, copy only the old data files (not the entire folder) to the new PC's "station name" folder. The data files will be titled by year and month and have a.wlk extension (e.g. 2011-09.wlk is Sept. 2011 data).


Please contact us with any further questions.

contact@davisweatherstation.com


What is the frequency of my weather data being updated on WeatherLink.Com? How Frequently Does My Information Get Sent To The Site?

What is the frequency of my weather data being updated on WeatherLink.Com? How Frequently Does My Information Get Sent To The Site?

Update frequency into weatherlink cloud

Your update frequency of your weather data is transmitted every minute as long as you have an active connection uploading data.


Please contact us with any further questions.

contact@davisweatherstation.com


What Are DID And Key Code, And How Do I Find Them?

What Are DID And Key Code, And How Do I Find Them?

Weatherlink Device ID

The DID and Key Code on the WeatherLink Network uniquely identify your WeatherLinkIP, Vantage Connect, and WeatherLink Network Annual Subscription (WeatherLink.com).

They're both necessary to create a WeatherLink.com account and are utilized to connect your device/service to your account.

You'll see a term that starts with "DID," which stands for "Device ID." It has 12 characters and includes the digits 0 through 9 as well as the letters A through F.

The DID can be found in the following locations:

Vantage Connect: On the label connected to the plastic cover inside the Vantage Connect and on the front cover of the Vantage Connect handbook, look for “DID” next to it.

The DID and Key are printed on a label affixed to the side of the WeatherLinkIP data logger.
Annual Subscription to the WeatherLink Network: 

When you create an account on WeatherLink.com, you will be given a DID and Key as part of the registration procedure.

APEXS: What Are DID And Key Code, And How Do I Find Them?


Please contact us with any further questions.

How do I join the WeatherLink network on WeatherLink.com?

Three Ways to Join the WeatherLink Network:

WeatherLinkIP

WeatherLinkIP allows you to send your weather data to WeatherLink.com without needing a computer. WeatherLinkIP automatically uploads your data even if your computer isn't turned on—in fact, a computer isn't even necessary to submit data! Find out more.

WeatherLink Network Subscription

Any Davis weather station with a USB or Serial data logger may be converted into a WeatherLink.com station with the WeatherLink Network Subscription. As long as your computer is turned on and the program is running, your weather data is automatically sent to WeatherLink.com with an annual membership. Find out more.

Vantage Connect

With the purchase of the Vantage Connect, you will receive a WeatherLink Network page. Find out more.


On WeatherLink.com you can:

  • CWOP (Citizen Weather Observer Program), Weather Underground, the GLOBE Program, and other third-party weather sites may all be used to automatically post data.
  • Receive e-mail notifications for current weather or basic alarm conditions.
  • Download the data to your PC for all of WeatherLink's sophisticated charting, graphing, and analysis. Extra User License Kits let you download data to many PCs separately, making them perfect for schools, farms, scientific fieldwork, and remote places.
  • Store four times the amount of data that your data logger can hold on its own.
  • View your data on the WeatherLink.com map or in the WeatherLink.com app for iPhone or Android.
  • Allow others to see your current weather data, or mark it as private.

Please contact us with any further questions.


Award winning and recognized